Making sense of a cross stitch pattern
Cross stitch patterns or 'charts' can look complicated at first glance but they are pretty simple to decipher with a little help.
 Where to start
 Where to start
The dotted line and/or arrows on the side of the chart show you where the centre of your pattern is. This is where you start. Cross stitch patterns are arranged in a grid of squares, a bit like graph paper. Each one of those little squares represents one cross stitch, with each corner of a square being a hole in the fabric, like this;
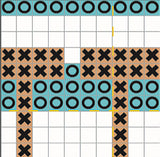

If there is no symbol in a square, there is no stitch there. The grid will often have darker lines every ten stitches to help you count larger areas of stitches.
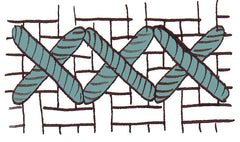
Sometimes if you are using linen or even weave your pattern will tell you to 'stitch over two'. This means instead of there being four holes on your fabric per cross stitch (one hole in each corner of a stitch) as above, there are three holes across and three up to make up one cross stitch, like this;

We help you to get to grips with different types of cross stitch fabrics in our fabric guide.
Your key
Patterns come in full colour (as per the example above) or in black and white. Often you will have many similar shades of the same colour and so each colour thread is represented by a symbol. The key shows you what colour thread you need for each symbol. The pattern will tell you both the brand of embroidery thread that you need and their colour codes along with a description. DMC, Anchor or Kreinik are some examples of well known brands and in our example pattern (and in all our kits) we have used DMC threads. (You can find colour converters on the internet to convert colour codes into their closest match from another brand.)

In the next two columns to the right you will learn how many strands of each thread you need to create the different types of stitches in the pattern. In this example, two strands of embroidery thread are used in every cross stitch. There is a small amount of back stitch too in the peach thread and again you need to use two strands of thread for those. For more about how to separate strands of embroidery floss, see our how to cross stitch tutorial.
Sometimes patterns will give you an indication of the amount of thread that you will need of that particular colour. These can be a helpful guide but your stitching style may mean your actual usage differs quite dramatically.
So that's it. You can now read a pattern. So go ahead. Thread up and dive in!